Magento 2
Introduction
The CrowdSec Bouncer extension for Magento 2 has been designed to protect Magento 2 websites from all kinds of attacks by using CrowdSec technology.
Prerequisites
To be able to use this component, the first step is to install CrowdSec v1. CrowdSec is only in charge of the "detection", and won't block anything on its own. You need to deploy a Remediation Component to "apply" decisions.
Please note that first and foremost CrowdSec must be installed on a server that is accessible via the Magento 2 site.
Usage
Features
When a user is suspected by CrowdSec to be malevolent, this component will either send a captcha to resolve or simply a page notifying that access is denied. If the user is considered as a clean user, he will access the page as normal.
By default, the ban wall is displayed as below:

By default, the captcha wall is displayed as below:
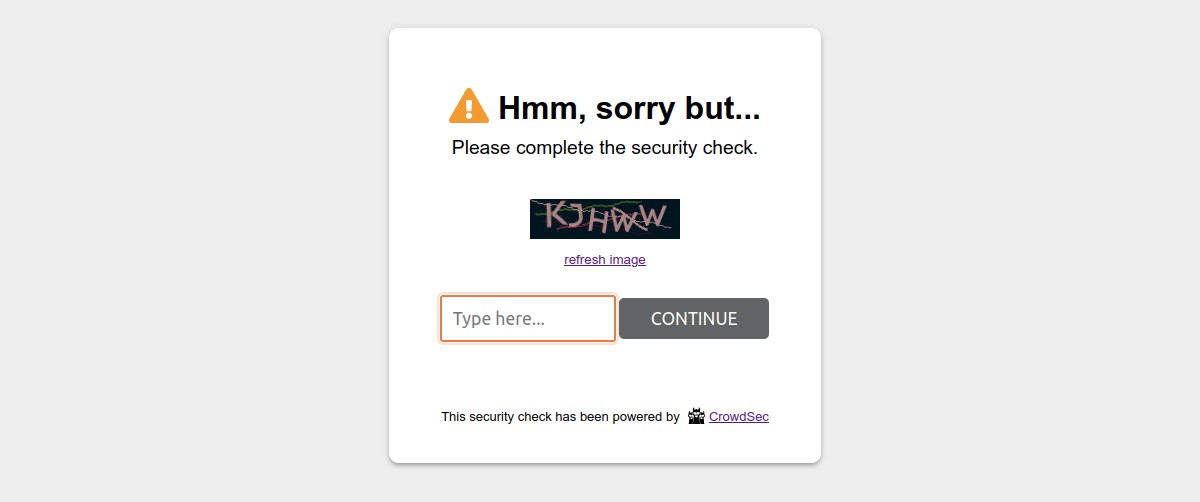
Please note that it is possible to customize all the colors of these pages in a few clicks so that they integrate best with your design.
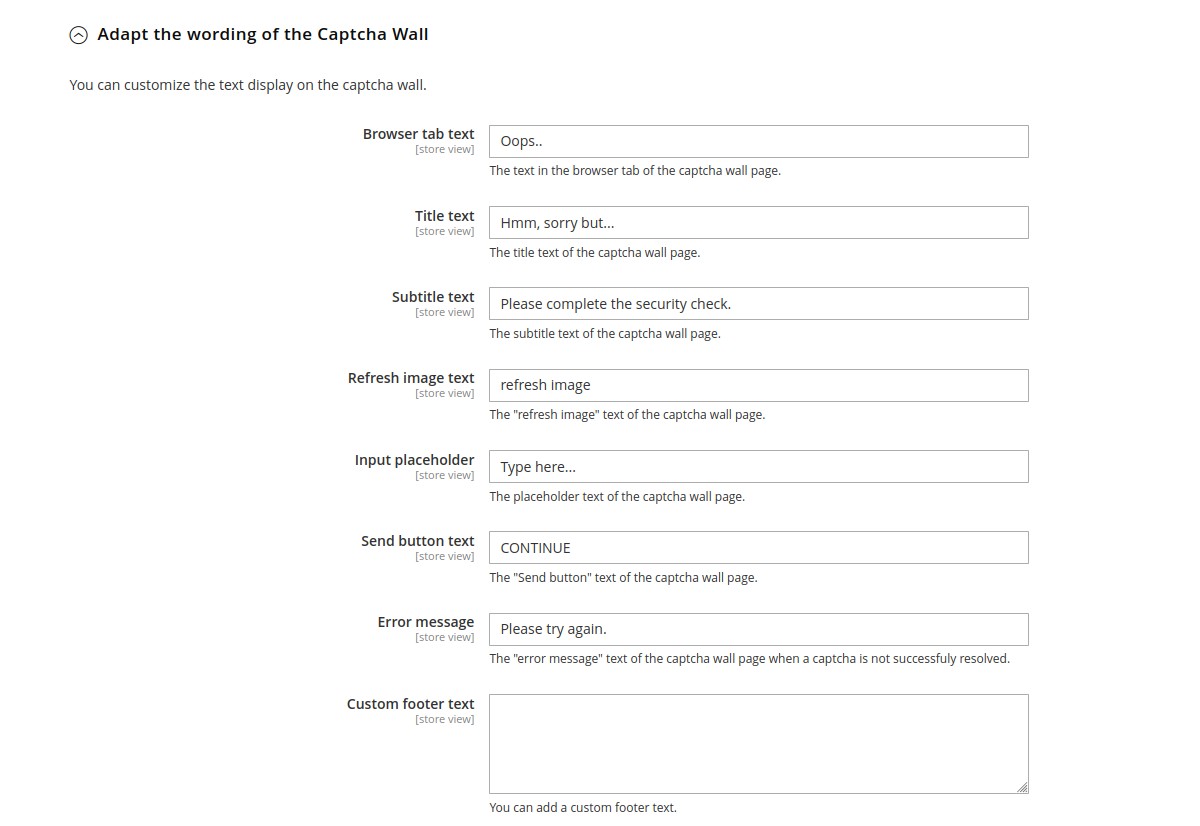
On the other hand, all texts are also fully customizable. This will allow you, for example, to present translated pages in your users’ language.
Configurations
This module comes with configurations that you will find under Stores → Configurations → Security → CrowdSec Bouncer admin section.
These configurations are divided in four main parts : General Settings, Theme customizations, Advanced settings and Events.
General Settings
In the General settings part, you will set your connection details and refine bouncing according to your needs.
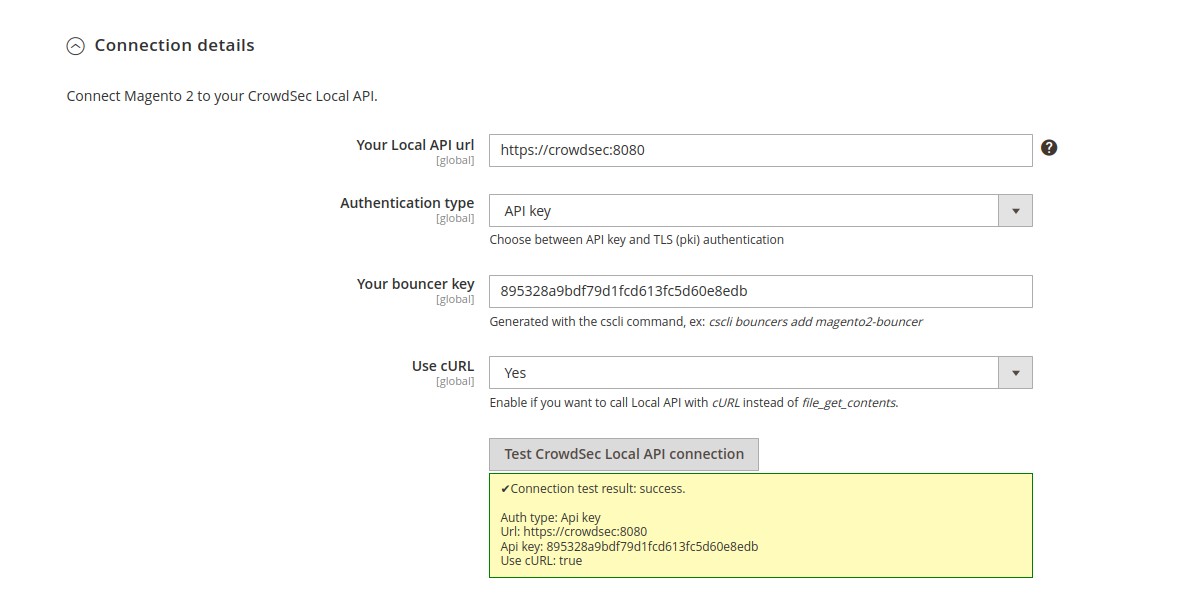
Connection details → Your Local API Url (global scope)
Url to join your CrowdSec Local API.
If the CrowdSec Agent is installed on this server, you could set this field to http://localhost:8080.
Connection details → Authentication type (global scope)
Choose between API key and TLS (pki) authentication.
TLS authentication is only available if you use CrowdSec agent with a version superior to 1.4.0. Please see CrowdSec documentation.
Connection details → Your component key (global scope)
Key generated by the cscli command.
Only if you chose Api key as authentication type.
Connection details → Path to the component certificate (global scope)
Relative path to the var folder of your Magento 2 instance.
Example: crowdsec/tls/component.pem.
Only if you chose TLS as authentication type.
Connection details → Path to the component key (global scope)
Relative path to the var folder of your Magento 2 instance.
Example: crowdsec/tls/component-key.pem.
Only if you chose TLS as authentication type.
Connection details → Enable TLS peer verification (global scope)
This option determines whether request handler verifies the authenticity of the peer's certificate.
Only if you chose TLS as authentication type.
When negotiating a TLS or SSL connection, the server sends a certificate indicating its identity.
If Enable TLS peer verification is set to true, request handler verifies whether the certificate is authentic.
This trust is based on a chain of digital signatures,
rooted in certification authority (CA) certificate you supply using the Path to the CA certificate for peer verification setting below.
Connection details → Path to the CA certificate for peer verification (global scope)
Relative path to the var folder of your Magento 2 instance.
Example: crowdsec/tls/ca-chain.pem.
Only if you chose TLS as authentication type.
Connection details → Use cURL (global scope)
By default, file_get_contents method is used to call Local API. This method requires to have enabled the option
allow_url_fopen.
Here, you can choose to use cURL requests instead. Beware that in this case, you need to have php cURL extension installed and enabled on your system.
N.B : Even before saving configuration, you can check if your settings are correct by clicking on the test button.

Bouncing → Enable bouncer on Frontend area (store view scope)
Choose which store views you want to protect.
Bouncing → Enable bouncer on Adminhtml area (global scope)
Choose if you want to protect admin too.
Bouncing → Enable bouncer on API areas (global scope)
Choose if you want to protect REST, SOAP and GraphQL endpoints.
N.B : For API calls, there will be no ban or captcha wall. User will receive a 401 (ban) or 403 (captcha) response code.
Bouncing → Bouncing level (store view scope)
Choose if you want to apply CrowdSec directives (Normal bouncing) or be more permissive (Flex bouncing).
With the Flex mode, it is impossible to accidentally block access to your site to people who don’t deserve it. This
mode makes it possible to never ban an IP but only to offer a Captcha, in the worst-case scenario.
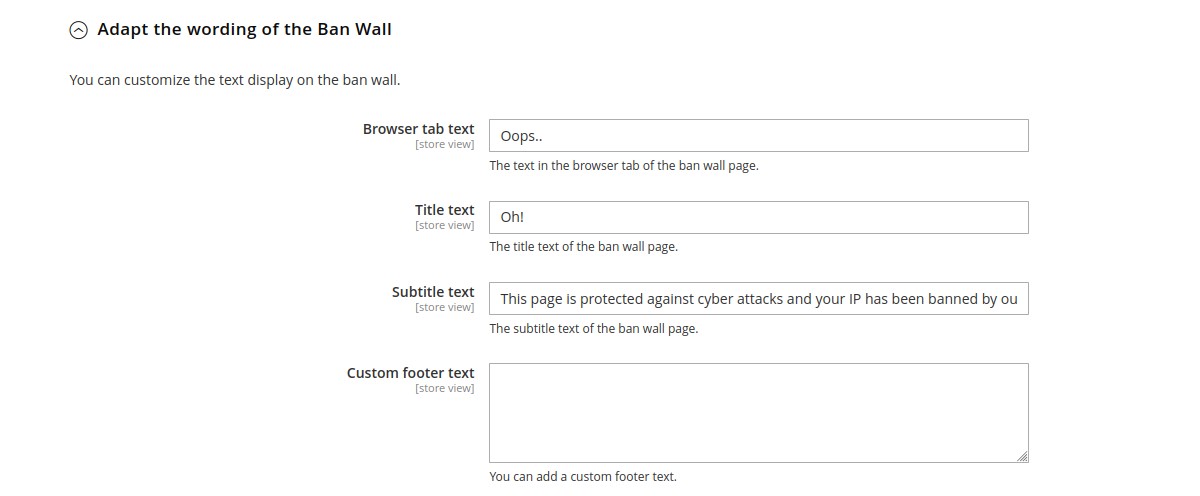
Theme customizations
In the Theme customizations part, you can modify texts and colors of ban and captcha walls. All fields here are
store view scoped, so you can use different languages and designs.

Advanced settings
In the Advanced settings part, you can enable/disable the stream mode, choose your cache system for your CrowdSec
Local API, handle your remediation policy and adjust some debug and log parameters.
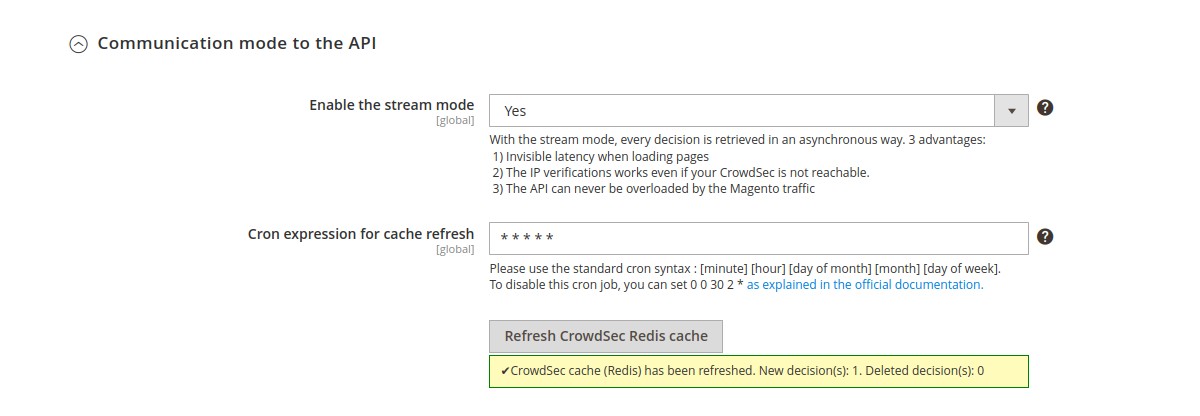
Communication mode to the API → Enable the stream mode (global scope)
Choose if you want to enable the stream mode or stay in live mode.
By default, the live mode is enabled. The first time a stranger connects to your website, this mode means that the IP will be checked directly by the CrowdSec API. The rest of your user’s browsing will be even more transparent thanks to the fully customizable cache system.
But you can also activate the stream mode. This mode allows you to constantly feed the bouncer with the malicious IP list via a background task (CRON), making it to be even faster when checking the IP of your visitors. Besides, if your site has a lot of unique visitors at the same time, this will not influence the traffic to the API of your CrowdSec instance.
Communication mode to the API → Cron expression for cache refresh (global scope)
With the stream mode, every decision is retrieved in an asynchronous way. Here you can define the frequency of this cache refresh.
N.B : There is also a refresh button if you want to refresh the cache manually.
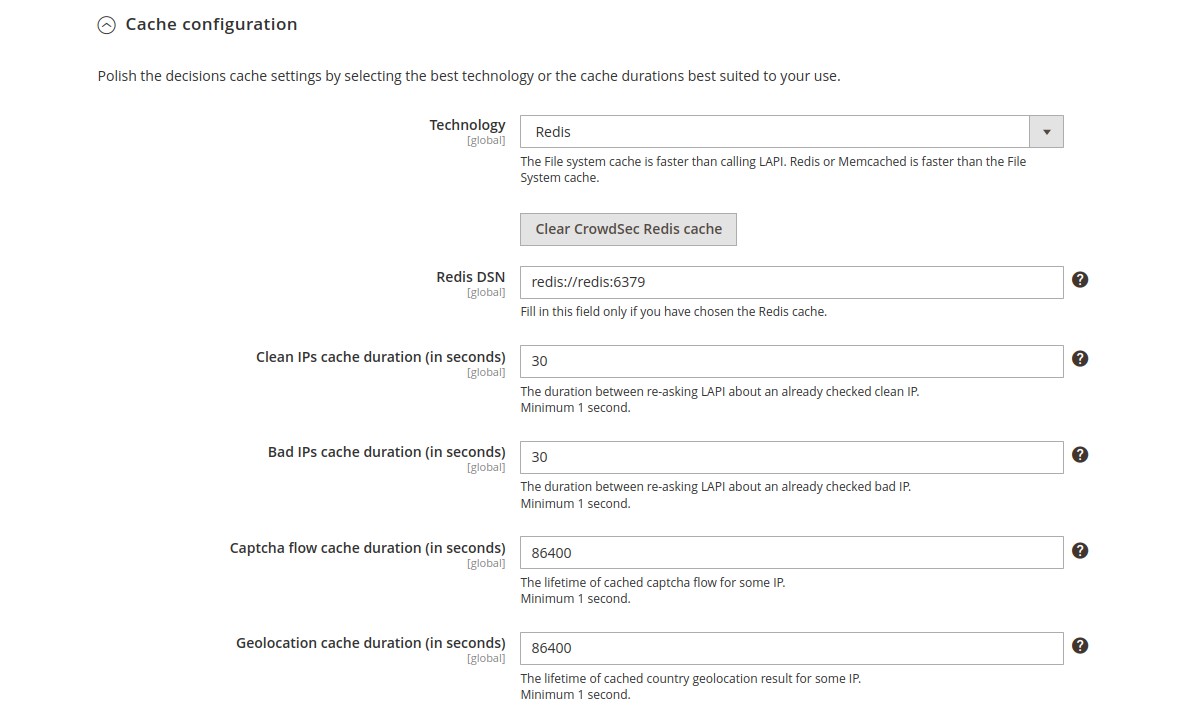
Cache configuration → Technology (global scope)
Choose the cache technology that will use your CrowdSec Local API.
The File system cache is faster than calling Local API. Redis or Memcached is faster than the File System cache.
N.B : There are also a clear cache button fo all cache technologies and a prune cache button dedicated to the file system cache.
Cache configuration → Cron expression for file system cache pruning (global scope)
If you chose file system as cache technology, you can schedule here an automatic cache pruning cron task.
Cache configuration → Redis DSN (global scope)
Only if you choose Redis cache as technology. Example of DSN: redis://localhost:6379.
Cache configuration → Memcached DSN (global scope)
Only if you choose Memcached cache as technology. Example of DSN: memcached://localhost:11211.
Cache configuration → Clean IPs cache duration (global scope)
The duration between re-asking Local API about an already checked clean IP.
Minimum 1 second. Note that this setting can not be apply in stream mode.
Cache configuration → Bad IPs cache duration (global scope)
The duration between re-asking Local API about an already checked bad IP.
Minimum 1 second. Note that this setting can not be apply in stream mode.
Cache configuration → Captcha flow cache duration (global scope)
The lifetime of cached captcha flow for some IP. If a user has to interact with a captcha wall, we store in cache some values in order to know if he has to resolve or not the captcha again.
Minimum 1 second.
Cache configuration → Geolocation cache duration (global scope)
The lifetime of cached country result for some IP. Note that this setting can not be apply only if the
Geolocation → Save geolocation country result in cache below is enabled.
Minimum 1 second.
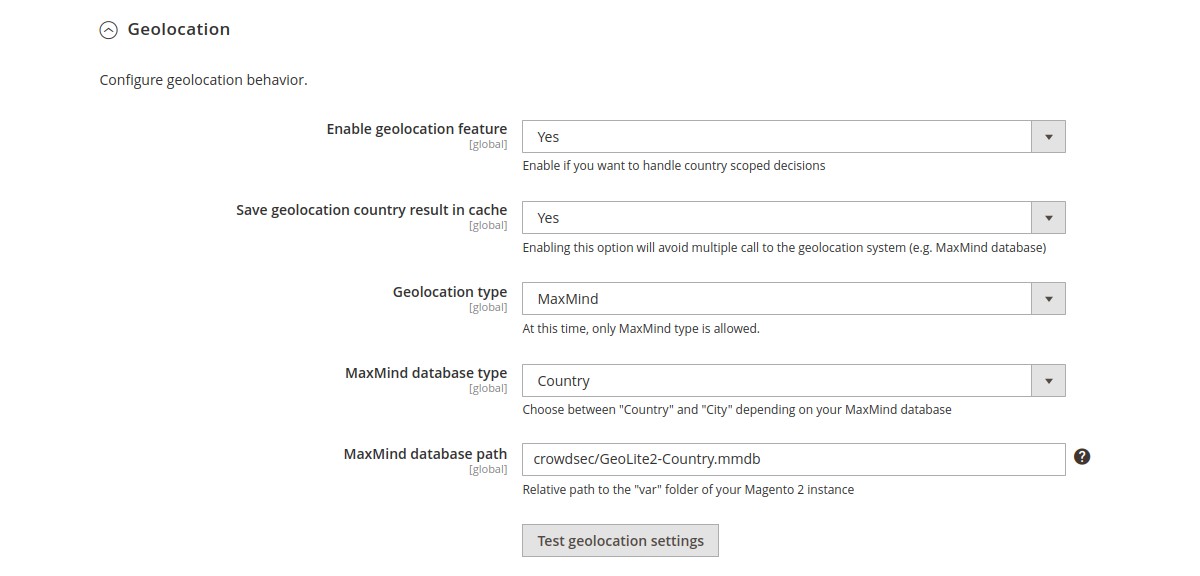
Geolocation → Enable geolocation feature (global scope)
Enable if you want to handle CrowdSec country scoped decisions.
Geolocation → Save geolocation country result in cache (global scope)
Enabling this option will avoid multiple call to the geolocation system (e.g. MaxMind database).
Geolocation → Geolocation type (global scope)
At this time, only MaxMind type is allowed.
Geolocation → MaxMind database type (global scope)
Choose between Country and City depending on your MaxMind database.
Geolocation → MaxMind database path (global scope)
Relative path to the var folder of your Magento 2 instance.
N.B : There is also a test button if you want to test your geolocation settings.

Remediations → Fallback to (global scope)
Choose which remediation to apply when CrowdSec advises unhandled remediation.
Remediations → Trust these CDN Ips (global scope)
If you use a CDN, a reverse proxy or a load balancer, it is possible to indicate in the bouncer settings the IP ranges of these devices in order to be able to check the IP of your users. For other IPs, the bouncer will not trust the X-Forwarded-For header.
Remediations → Hide CrowdSec mentions (global scope)
Enable if you want to hide CrowdSec mentions on the Ban and Captcha walls.
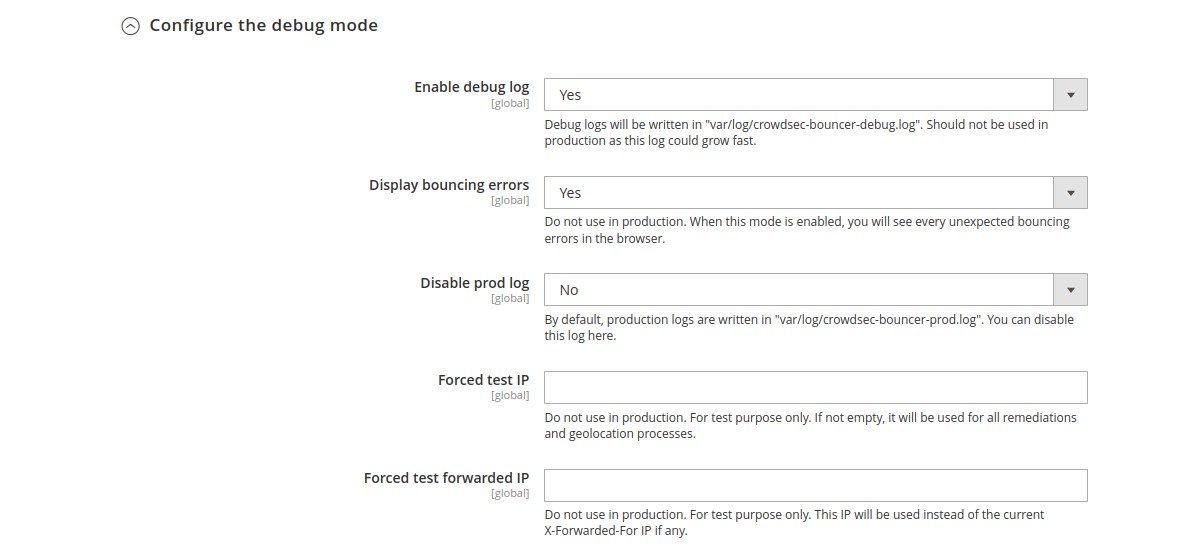
Configure the debug mode → Enable debug log (global scope)
Enable if you want to see some debug information in a specific log file.
Configure the debug mode → Display bouncings errors (global scope)
When this mode is enabled, you will see every unexpected bouncing errors in the browser.
Configure the debug mode → Disable prod log (global scope)
The prod log is lighter than the debug log. But you can disable it here.
Configure the debug mode → Forced test IP (global scope)
For test purpose only. If not empty, this IP will be used for all remediations and geolocation processes.
Configure the debug mode → Forced test forwarded IP (global scope)
For test purpose only. This IP will be used instead of the current X-Forwarded-For IP if any.
Events
In the Events part, you can enable business events logging. Using it in combination to a specific CrowdSec
scenario allows detecting suspicious behavior as credential or credit card stuffing.
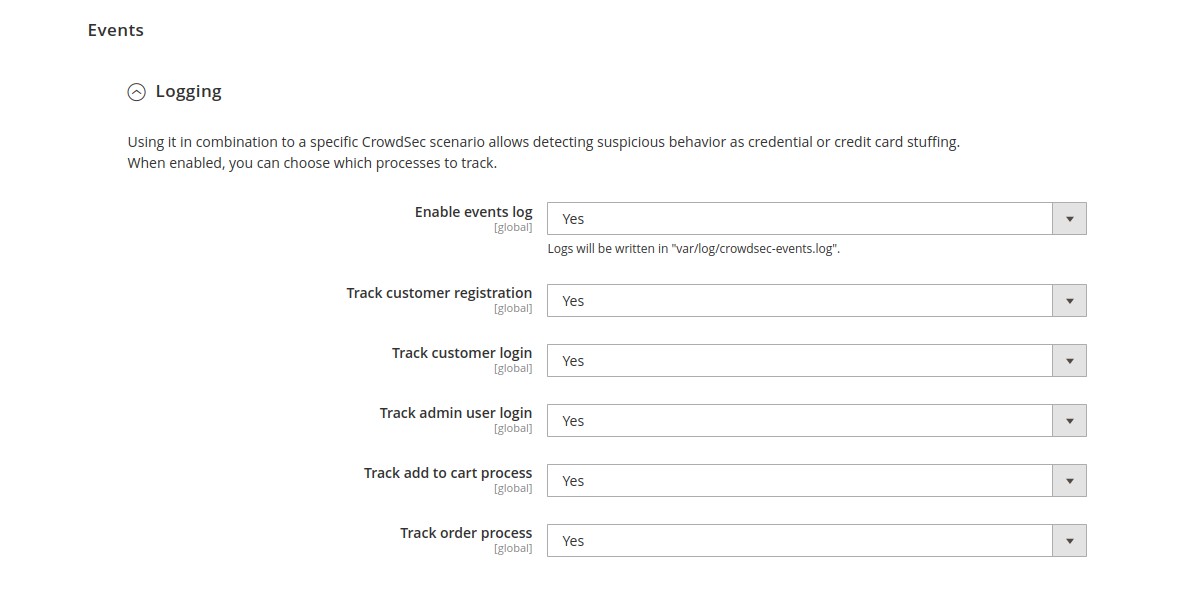
Logging → Enable events log (global scope)
If enabled, logs will be written in a var/log/crowdsec-events.log file.
Logging → Track customer registration (global scope)
Will be used to detect suspicious account creation.
Logging → Track customer login (global scope)
Will be used to detect credential stuffing.
Logging → Track admin user login (global scope)
Will be used to detect admin brute attacks.
Logging → Track add to cart process (global scope)
Will be used to detect suspicious behaviour with add to cart action.
Logging → Track order process (global scope)
Will be used to detect suspicious behaviour, as credit card stuffing, on order action.
Auto Prepend File mode
By default, this extension will bounce every web requests: e.g requests called from webroot index.php.
This implies that if another php public script is called (cron.php if accessible for example, or any of your
custom public php script) bouncing will not be effective.
To ensure that any php script will be bounced if called from a browser, you should try the auto prepend file mode.
In this mode, every browser access to a php script will be bounced.
To enable the auto prepend file mode, you have to:
- copy the
crowdsec-prepend.php.examplefile in your Magento 2app/etcfolder and rename itcrowdsec-prepend.php - configure your server by adding an
auto_prepend_filedirective for your php setup.
N.B:
- Beware that you have to copy the file before modifying your PHP configuration,or you will get a PHP fatal error.
- Note that if you upgrade the bouncer module, you should have to copy the file again. To make this copy
automatically, you should modify the root
composer.jsonof your Magento 2 projects by addingpost-install-cmdandpost-update-cmdto the scripts parts:
"scripts": {
    "post-install-cmd": [
        "php -r \"copy('vendor/crowdsec/magento2-module-bouncer/crowdsec-prepend.php.example','app/etc/crowdsec-prepend.php');\""
    ],
    "post-update-cmd": [
        "php -r \"copy('vendor/crowdsec/magento2-module-bouncer/crowdsec-prepend.php.example','app/etc/crowdsec-prepend.php');\""
    ]
}
Adding an auto_prepend_file directive can be done in different ways:
PHP
You should add this line to a .ini file :
auto_prepend_file = /magento2-root-directory/app/etc/crowdsec-prepend.php
Nginx
If you are using Nginx, you should modify your Magento 2 nginx configuration file by adding a fastcgi_param
directive. The php block should look like below:
location ~ \.php$ {
    ...
    ...
    ...
    fastcgi_param PHP_VALUE "/magento2-root-directory/app/etc/crowdsec-prepend.php";
}
Apache
If you are using Apache, you should add this line to your .htaccess file:
php_value auto_prepend_file "/magento2-root-directory/app/etc/crowdsec-prepend.php"
Installation
Requirements
- Magento >= 2.3
Composer installation
Use Composer by simply adding crowdsec/magento2-module-bouncer as a dependency:
composer require crowdsec/magento2-module-bouncer
Post Installation
Enable the module
After the installment of the module source code, the module has to be enabled by the Magento 2 CLI.
bin/magento module:enable CrowdSec_Bouncer
System Upgrade
After enabling the module, the Magento 2 system must be upgraded.
If the system mode is set to production, run the compile command first. This is not necessary for the developer mode.
bin/magento setup:di:compile
Then run the upgrade command:
bin/magento setup:upgrade
Clear Cache
The Magento 2 cache should be cleared by running the flush command.
bin/magento cache:flush
Deploy static content
At last, you have to deploy the static content:
bin/magento setup:static-content:deploy -f
Troubleshooting
Higher matching error
If a new version y.y.y has been published in Packagist and the Marketplace review process of this version is still in progress,
you could encounter the following error during installation on update:
Higher matching version y.y.y of crowdsec/magento2-module-bouncer was found in public repository packagist.org than x.x.x in private https://repo.magento.com. Public package might've been taken over by a malicious entity, please investigate and update package requirement to match the version from the private repository
This error is due to the magento/composer-dependency-version-audit-plugin composer plugin introduced in Magento 2.4.3 as a security measure against Dependency Confusion attacks.
Install the latest Marketplace release
To avoid this error and install the latest known Marketplace release x.x.x, you could run:
composer require crowdsec/magento2-module-bouncer --no-plugins
Install the latest Packagist release
To avoid this error and install the latest known Packagist release y.y.y, you could modify the root composer.json of your Magento project by setting the repo.magento.com repository as non-canonical:
"repositories": {
    "0": {
        "type": "composer",
        "url": "https://repo.magento.com/",
        "canonical": false
    }
},
And then run the same command:
composer require crowdsec/magento2-module-bouncer --no-plugins
As an alternative, you can also exclude the crowdsec/magento2-module-bouncer from the repo.magento.com repository:
"repositories": {
    "0": {
        "type": "composer",
        "url": "https://repo.magento.com/",
        "exclude": ["crowdsec/magento2-module-bouncer"]
    }
},
Thus, running composer require crowdsec/magento2-module-bouncer will always pick up the latest y.y.y Packagist release.
Technical notes
See Technical notes
Developer guide
See Developer guide

